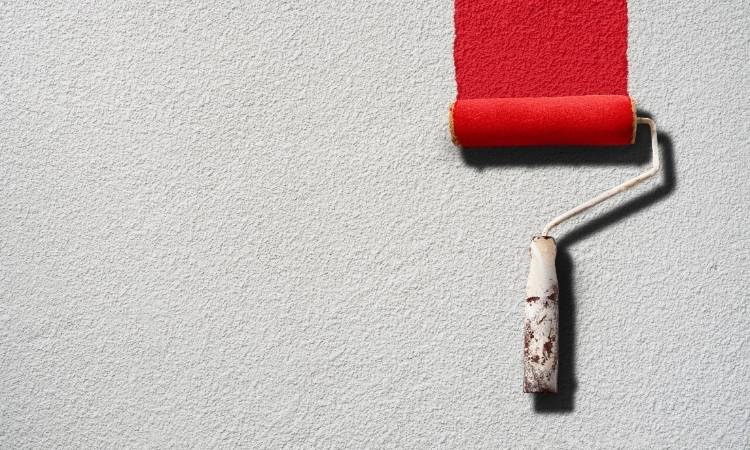
Textured paint is an excellent way to add depth, character, and a modern touch to your walls. Unlike traditional flat paint, textured paint can transform a plain surface into a focal point, giving your home or office a unique and stylish appeal. If you’ve been considering giving your walls a fresh makeover, this step-by-step guide will help you apply textured paint in Singapore like a professional, even if it’s your first time.
Understanding Textured Paint
Before starting, it’s essential to understand what textured paint is. Textured paint contains additives that create a raised surface, offering a three-dimensional effect. It comes in various finishes, including sand, stone, and metallic textures. Choosing the right type depends on the room’s style, lighting, and your personal preference. For instance, sandy textures work well in living rooms, while smooth stone finishes may suit bedrooms or hallways.
For those looking to elevate their home design, textured paint Singapore offers a wide range of options that combine durability with visual appeal, making it a popular choice among homeowners and interior designers alike.
Step 1: Prepare Your Walls
Proper wall preparation is crucial to achieving a flawless textured finish. Start by cleaning the walls thoroughly to remove dust, grease, or any previous paint residue. In Singapore’s humid climate, mold and mildew are common, so inspect the walls for any signs and treat them with an anti-fungal solution if necessary.
Next, fill in any cracks or holes using a high-quality wall filler. Once dry, sand the surface lightly to create an even base. Remember, textured paint exaggerates imperfections, so a smooth foundation is key. After sanding, wipe the walls with a damp cloth to remove dust and allow them to dry completely.
Step 2: Gather the Right Tools
Applying textured paint requires specific tools. While a standard paintbrush or roller may work for simple textures, professional results often need:
- Trowel or putty knife: Ideal for spreading thick textured paint evenly.
- Roller with a thick nap: Suitable for larger areas, ensuring a consistent texture.
- Texturing comb or sponge: Useful for creating unique patterns like swirls or waves.
- Painter’s tape and drop cloths: Protect trims, floors, and furniture.
Investing in these tools will make the process smoother and help you achieve a professional finish.
Step 3: Prime Your Walls
Priming your walls ensures that the textured paint adheres properly and lasts longer. Choose a primer compatible with your chosen textured paint type. Apply a thin, even coat using a roller or brush and allow it to dry fully, typically for 4 to 6 hours. This step also enhances the paint’s color vibrancy and prevents uneven absorption.
Step 4: Mix the Textured Paint
Textured paint may come pre-mixed, but some variants require mixing additives to achieve the desired effect. Follow the manufacturer’s instructions carefully. If you want to create your custom texture, experiment with small batches to perfect the consistency and finish. Stir the paint thoroughly to avoid lumps and ensure an even texture across your walls.
Step 5: Apply the Base Coat
Start with a base coat of textured paint, spreading it evenly across the wall using a roller or trowel. Work in small sections to prevent the paint from drying before you can texture it. Keep the layer consistent; too thick may lead to cracking, while too thin may not achieve the desired effect.
See also: Hybrid Inverters: The Smart Way to Power Your Home
Step 6: Create the Texture
This is where your creativity comes into play. Depending on the pattern you want:
- Swirl effect: Use a brush or sponge in circular motions.
- Waves or lines: Drag a comb or trowel across the wet paint.
- Random texture: Dab with a sponge or cloth for a rustic, uneven look.
Work methodically, section by section, and remember that consistency is crucial. If mistakes happen, simply smooth the area with a trowel and reapply.
Step 7: Allow Sufficient Drying Time
Textured paint takes longer to dry than regular paint due to its thickness. In Singapore’s humid environment, drying may take 12–24 hours, depending on the room’s ventilation. Avoid touching the walls during this period to preserve the texture and prevent smudging.
Step 8: Apply a Top Coat (Optional)
For added protection and durability, consider applying a clear topcoat or sealer. This step is particularly useful in high-traffic areas or rooms prone to moisture, like kitchens and bathrooms. The topcoat also enhances the texture’s appearance and makes cleaning easier.
Step 9: Clean Up
Clean your tools immediately after use. Warm water works for water-based textured paints, while mineral spirits may be necessary for oil-based variants. Remove painter’s tape carefully, and dispose of drop cloths or wash them if reusable.
Step 10: Admire Your Work
Once the paint is completely dry, step back and admire your newly transformed walls. Textured paint not only adds style but also hides minor imperfections, giving your space a professional, polished look.
Tips for a Professional Finish
- Practice first: Test your chosen texture on a small wall or board before committing.
- Work in natural light: This helps spot uneven areas.
- Keep the room ventilated: Proper airflow speeds up drying and prevents mold growth.
- Use quality paint: Cheaper options may crack or peel over time.
- Consistency is key: Apply even pressure when creating textures to avoid irregular patterns.
Conclusion
Applying textured paint in Singapore is a rewarding way to elevate your home’s interior. With careful preparation, the right tools, and attention to detail, anyone can achieve professional results. By following this step-by-step guide, you’ll not only create stunning walls but also gain the satisfaction of completing a project that truly reflects your style. Whether you choose a subtle finish or bold textures, textured paint is a smart choice for anyone looking to refresh their space with creativity and elegance.